Bloog Bot
Machine or Mannequin
Triggering a one-off behavior with the Test method has been useful to see if our code is working, but what we really want is to turn the bot on and have it run indefinitely, observing the world, making decisions, and altering its behavior accordingly. We want to give it intelligence. The field of AI is hot right now, and I've wanted to learn more about it and apply some of those principles to the bot, but for the time being, we're going to stick with a tried and true approach. We're going to use a state machine.
Most people that have studied computer science have no doubt studied state machines. Again I will direct you to Robert Nystrom's "Game Programming Patterns" - specifically the chapter on State. I strongly encourage you to go read the entire thing before continuing with this chapter.
I've gone through several iterations of this code, and I'm sure it will continue to evolve, but the currently implemention that I've settled on uses a specific kind of state machine known as a Pushdown Automata. Pushdown Automata provide "memory" to the state machine, giving it a sense of history so it knows its previous state. This is implemented using a stack. This is incredibly useful for our bot for a number of reasons. Consider the following situation - your bot is running from Point A to Point B, but it gets waylaid by an aggresive enemy on the way. The bot is smart enough to defend itself, so it moves from the "Travel State" to the "Combat State". But what happens when combat ends? In order to resume its journey from Point A to Point B, it needs to revert back to it's "Travel State", and have context about where it was along the journey.
This type of behavior can be implemented quite easily using a stack. In a traditional state machine, you transition from one state to the next, but you retain no information about the previous state. Using a Pushdown Automata, when you transition to a new state, you push that state onto a stack. If you want to revert back to the previous state, you simply pop the current state off the stack. If you want to transition to a new state, you can continue pushing new states onto the stack.
So, let's forget about fancy stuff like fighting and moving for now and just get the skeleton of our bot working. Here is what we're going to shoot for:
- The ability to Start and Stop the bot using buttons in the UI.
- The ability to push a new state onto the stack. We'll define two states and add buttons to the UI that will push those states onto the stack.
- The ability to pop states off the stack using a button from the UI.
Here's the high level of how we'll achieve this. The bot's behavior will be encapsulated in its states. Movement will be handled by a MoveState, combat will be handled by a CombatState, and so on. Each state will implement an Update method that executes that states behavior. The bot will maintain a stack of states, and run an endless loop that simply calls Update() on the state at the top of the stack. This endless loop will run on a separate thread so it doesn't block the main thread (the UI runs on the main thread so this would block the UI from being interacted with).
First create an interface for our bot states:
public interface IBotState
{
    void Update();
}
Then create two states that implement the IBotState interface:
class CryState : IBotState
{
    public void Update() => Console.WriteLine("Cry :(");
}

class YellState : IBotState
{
    public void Update() => Console.WriteLine("Yell!!!!");
}
Finally, create a class for the bot:
class Bot
{
    readonly Stack<IBotState> botStates = new Stack<IBotState>();

    bool running;

    internal void PushState(IBotState state) => botStates.Push(state);

    internal void PopState()
    {
        if (botStates.Count > 0)
            botStates.Pop();
    }

    internal void Stop()
    {
        Console.WriteLine("\n--- STOPPING BOT ---\n");
        running = false;
        while (botStates.Count > 0)
            botStates.Pop();
    }

    internal void Start()
    {
        Console.WriteLine("\n--- STARTING BOT ---\n");
        running = true;
        StartInternal();
    }

    async void StartInternal()
    {
        while (running)
        {
            try
            {
                if (botStates.Count == 0)
                    Console.WriteLine("Bot currently has no state.");
                else
                    botStates.Peek()?.Update();

                await Task.Delay(1000);
            }
            catch (Exception e)
            {
                Console.WriteLine($"Error occured inside Bot's main loop: {e}");
            }
        }
    }
}
Notice that the Bot class maintains a Stack to keep track of its current and previous states. As we continue to add functionality to our bot, this Bot class will serve as the orchestrator of our state machine, pushing and popping states off the stack depending on certain events in the world (each state will also be able to push/pop states from the stack to determine their own state transitions, as you'll see later).
Those familiar with traditional async and await usage in C# might be skeptical of the async void StartInternal() you see above, so let me explain my reasoning here. We want the bot to run an endless loop, but that has the potential to block the UI thread that will ultimately be calling this code, so we need to design this carefully. So by making this StartInternal method async void, then calling it from Start without using await, it's going to kick off this while loop on a different thread, thus leaving the UI thread responsive. But it's also important to be able to stop the endless loop from the UI thread - which is where the running variable comes into play. We create a Stop method that will clear off the stack, then set running to false, which will break the endless loop. In other words, this allows us to start and stop our bot's main loop while still leaving the main UI thread responsive to user interaction.
Now we need to wire up some new buttons in the UI to call these new methods. Instantiate a new Bot object from the MainViewModel, and add some new commands for the new buttons we'll be adding to the UI:
...

readonly Bot bot = new Bot();

...

// Start command
ICommand startCommand;

void Start() => bot.Start();

public ICommand StartCommand =>
    startCommand ?? (startCommand = new CommandHandler(Start, true));

// Stop command
ICommand stopCommand;

void Stop() => bot.Stop();

public ICommand StopCommand =>
    stopCommand ?? (stopCommand = new CommandHandler(Stop, true));

// PushCryState command
ICommand pushCryStateCommand;

void PushCryState() => bot.PushState(new CryState());

public ICommand PushCryStateCommand =>
    pushCryStateCommand ?? (pushCryStateCommand = new CommandHandler(PushCryState, true));

// PushYellState command
ICommand pushYellStateCommand;

void PushYellState() => bot.PushState(new YellState());

public ICommand PushYellStateCommand =>
    pushYellStateCommand ?? (pushYellStateCommand = new CommandHandler(PushYellState, true));

// PopState command
ICommand popStateCommand;

void PopState() => bot.PopState();

public ICommand PopStateCommand =>
    popStateCommand ?? (popStateCommand = new CommandHandler(PopState, true));
Add the buttons to the UI in MainWindow.xaml:
<Button Grid.Row="0" Grid.Column="0" Command="{Binding StartCommand}" Content="Start" Padding="1" Margin="6,10,344,0"/>
<Button Grid.Row="0" Grid.Column="0" Command="{Binding StopCommand}" Content="Stop" Padding="1" Margin="54,10,296,0"/>
<Button Grid.Row="0" Grid.Column="0" Command="{Binding PushCryStateCommand}" Content="PushCryState" Padding="1" Margin="102,10,202,0"/>
<Button Grid.Row="0" Grid.Column="0" Command="{Binding PushYellStateCommand}" Content="PushYellState" Padding="1" Margin="196,10,109,0"/>
<Button Grid.Row="0" Grid.Column="0" Command="{Binding PopStateCommand}" Content="PopState" Padding="1" Margin="289,10,45,0"/>
And finally, we need to add a few lines of code to App.xaml.csApp class to allocate an output console:
public partial class App : Application
{
    [DllImport("Kernel32")]
    static extern void AllocConsole();

    protected override void OnStartup(StartupEventArgs e)
    {
        Debugger.Launch();
        AllocConsole(); // this will launch the Console so we can see our debug text

        // throttle framerate to fix ClickToMove on higher refresh rate monitors
        DirectXManager.ThrottleFPS();

        // enable ClickToMove fix
        MemoryManager.WriteBytes((IntPtr)CLICK_TO_MOVE_FIX, new byte[] { 0, 0, 0, 0 });

        var mainWindow = new MainWindow();
        Current.MainWindow = mainWindow;
        mainWindow.Closed += (sender, args) => { Environment.Exit(0); };
        mainWindow.Show();

        base.OnStartup(e);
    }
}
Fire up the bot and play around with the bot's commands. While the bot is running, it will call Update on the current state every 1000ms There's some code that writes debug text to the console so we can make sure everything is working correctly.
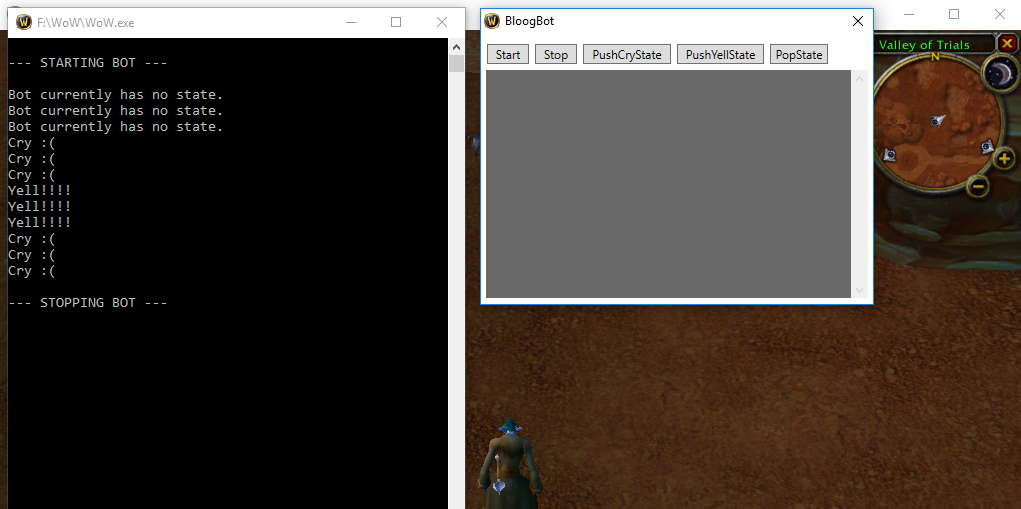
As a recap, here's what I clicked in the example above, with an explanation:
- Click "Start": bot is now running, but the stack is empty, so
Updateisn't called. - Click "PushCryState":
CryState.Updateis called, printing "Cry :(" to the console. - Click "PushYellState":
YellStateis pushed onto the state.CryStateis still underneath, butYellState.Updateis called because it's on top of the stack, and "Yell!!!" is printed to the console. - Click "PopState":
YellStateis popped off the stack, andCryStatebecomes the current state, and "Cry :(" is printed to the console once again. - Click "Stop", and our while loop terminates, stopping the bot.
This is the foundation for a very powerful system that will allow us to create a sophisticated set of behavior for our bot. We'll continue improving it as we go. As a sneak peek, here's what the Update method of a CombatState for a warrior might look like:
- IF target is dead, pop combat state from stack.
- IF player is less than 50% health, push new
HealSelfstate onto stack. - IF you just dodged, use Overpower.
- IF target has less than 20% HP, use Execute.
- etc.
Every time Update is called, the bot will gather any necessary information from its environment (current HP, target's HP, etc), then run through the list of conditions and act accordingly.
Before we start building the states necessary for our bot to grind on its own, we need to beef up the WoWUnit class to expose some more useful information that will allow the bot to find a proper target and fight effectively.