Bloog Bot
Runtime Reload
As we start to spend more time working with our state machine, it's going to get really annoying to have to close the client, compile our changes, restart the bot, and log back into the game every time we want to test a little change. We're going to fix that problem by reorganizing our solution in such a way that we'll be able to recompile our state machine and reload it into the WoW process while our bot is injected into the WoW client. We'll use the Managed Extensibility Framework (MEF) to accomplish this.
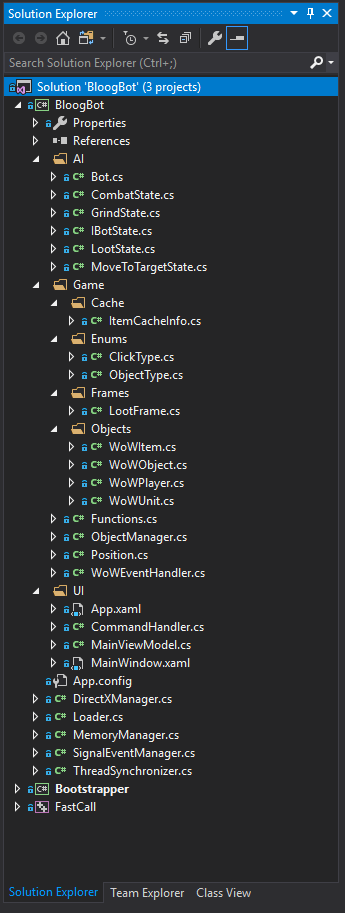
It's been a while since I showed the solution and project hierarchy, so before we start moving stuff around, here's a snapshot of what mine looks like at the beginning of this chapter:
We want to completely decouple our state machine from the core bot engine, so we're going to take everything from the AI folder and move it into a new project. Create a new .NET Framework class library and give it a name (mine is called WarriorBot), move all the files from BloogBot/AI into the new project, and update the namespaces appropriately. You'll also have to add a reference to the BloogBot project from the new WarriorBot project. You can delete all the files that you moved from BloogBot.
Now, we have a bit of a problem. We moved Bot.cs out of BloogBot, so the private variable of type Bot in our MainViewModel will break the project. We're going to solve that problem by creating an IBot interface in the BloogBot project, then have WarriorBot.Bot implement that interface. Then you can update the line in MainViewModel to use type IBot instead of Bot. BloogBot will provide the interface, and WarriorBot will provide the implementation. Here's the IBot interface:
public interface IBot
{
    void Start();

    void Stop();
}
Now, instead of just instantiating a new Bot object from MainViewModel, we're going to have to do something different. This is where MEF comes into play. First we'll need to add a reference to System.ComponentModel.Composition because this isn't added to new .NET projects by default (you can do so by right clicking the project, add, reference, assemblies, framework). Now, in the WarriorBot project, open Bot.cs and add an Export attribute to the class declaration like so:
[Export(typeof(IBot))]
class Bot : IBot
{
  ...
}
Next, open the project properties for WarriorBot, go to the Build tab, and change the output path to ..\Bot\ to make sure the .dll is placed in the same folder as the rest of our output files.
That's it for WarriorBot. Now, create a new BotLoader class in the BloogBot project. It should look like this:
class BotLoader
{
    // change this to point to wherever Warrior.dll exists on your disk
    const string BOT_PATH = @"C:\Users\Drew\Repos\bloog-bot-v2\Bot\WarriorBot.dll";

    [Import(typeof(IBot))]
    IBot bot = null;

    AggregateCatalog catalog;
    CompositionContainer container;

    public BotLoader()
    {
        AppDomain.CurrentDomain.AssemblyResolve += (sender, args) => Assembly.GetExecutingAssembly();
    }

    internal IBot ReloadBot()
    {
        var assembly = Assembly.Load(File.ReadAllBytes(BOT_PATH));
        catalog = new AggregateCatalog();
        catalog.Catalogs.Add(new AssemblyCatalog(assembly));
        container = new CompositionContainer(catalog);
        container.ComposeParts(this);

        return bot;
    }
}
The AggregateCatalog and CompositionContainer classes come from MEF. This is cool, because MEF handles wiring up the import and export types for us, and instantiating the IBot object that we're exporting from the WarriorBot project. If you're curious about the AggregateCatalog and CompositionContainer classes, you can read more about MEF online. I know very little about it beyond what I've learned to make this work. You'll also have to update the BOT_PATH string to point to the correct location on your machine.
The only other tricky piece here is this line:
AppDomain.CurrentDomain.AssemblyResolve += (sender, args) => Assembly.GetExecutingAssembly();
Without that line, you'll get an error that BloogBot.dll can't be found. And this makes sense considering the way we've injected BloogBot into an existing WoW process. AppDomain.CurrentDomain gets initialized from the WoW client folder, so it's not going to find any .dlls that we have in the output folder of our bot solution. This line basically says "when you fail to resolve an assembly, try to use the current executing assembly", which in this case is BloogBot. I think it's a bit weird how MEF handles this, but it's the best way I've found to get around the problem.
Next, we need to add a new Reload command (make sure you also add a button to MainWindow.xaml and wire it up with the ReloadBotCommand), and instantiate a new BotLoader at the top of MainViewModel. We're also going to change our local Bot bot field. See all the new code below:
MainViewModel.cs:
...

readonly BotLoader botLoader = new BotLoader();
IBot bot;

public MainViewModel()
{
    bot = botLoader.ReloadBot();
}

...

ICommand reloadBotCommand;

void ReloadBot() => bot = botLoader.ReloadBot();

public ICommand ReloadBotCommand =>
    reloadBotCommand ?? (reloadBotCommand = new CommandHandler(ReloadBot, true));
And make sure you call ReloadBot from the constructor of MainViewModel so the bot gets properly initialized at startup. To test this out, modify the Bot.Start method in the WarriorBot project to just print some text to the Console.
public void Start(ObjectManager objectManager, WoWEventHandler wowEventHandler)
{
    Console.WriteLine("Bot version 1");
    //Running = true;
    //botStates.Push(new GrindState(botStates, objectManager, wowEventHandler));
    //StartInternal();
}
Fire up the bot, click the Start button, then modify the Start method to print something different, compile, click Reload, and click Start again. You should see the updated Start method.
Now, this works fine if we only want to work on a single bot. But what if we want to have different functionality (ie: a different CombatState) for two different classes? We're using a Warrior now, but we might want to also create a Mage later on. To do this, we're going to update our bot loading code a bit. First, get rid of the IBot bot field from MainViewModel, and replace it with public ObservableCollection<IBot> Bots { get; private set; }. Next, in MainViewModel, update your ReloadBot command to look like this:
void ReloadBots()
{
    Bots = new ObservableCollection(botLoader.ReloadBots());
}
And finally update your BotLoader class to look like this:
class BotLoader
{
    readonly IDictionary<string, string> assemblies = new Dictionary<string, string>();

    [ImportMany(typeof(IBot), AllowRecomposition = true)]
    List bots;

    AggregateCatalog catalog = new AggregateCatalog();
    CompositionContainer container;

    public BotLoader()
    {
        AppDomain.CurrentDomain.AssemblyResolve += (sender, args) => Assembly.GetExecutingAssembly();
    }

    internal List<IBot> ReloadBots()
    {
        bots?.Clear();
        container?.Dispose();

        var currentFolder = Path.GetDirectoryName(Assembly.GetExecutingAssembly().Location);
        var botPaths = new[] { "WarriorBot.dll" }; // add additional DLLs here!

        foreach (var botPath in botPaths)
        {
            var path = Path.Combine(currentFolder, botPath);
            var assembly = Assembly.Load(File.ReadAllBytes(path));
            var assemblyName = assembly.FullName.Split(',')[0];
            if (assemblies.ContainsKey(assemblyName))
            {
                if (assemblies[assemblyName] != assembly.FullName)
                {
                    catalog.Catalogs.Add(new AssemblyCatalog(assembly));
                    assemblies[assemblyName] = assembly.FullName;
                }
            }
            else
            {
                catalog.Catalogs.Add(new AssemblyCatalog(assembly));
                assemblies.Add(assemblyName, assembly.FullName);
            }
        }
        container = new CompositionContainer(catalog);
        container.ComposeParts(this);

        return bots
            .GroupBy(b => b.Name)
            .Select(b => b.Last())
            .ToList();
    }
}
I'm not going to go over the code above - feel free to read up on how MEF works to understand everything. Also note that for simplicity's sake, I'm hardcoding a list of bot dlls, so as you create more bots (by creating more C# projects that compile into bot dlls), you'll have the add the filenames above. It wouldn't be hard to make this code smart enough to automatically pick up .dlls based on a naming convention or something like that. You'll see we're referencing a new Name field on the IBot interface. Add this to IBot.cs:
string Name { get; }
And add this to Bot.cs:
public string Name => "Warrior Bot";
In anticipation of creating additional bot projects (for the other WoW character classes), let's rename Bot.cs to WarriorBot.cs. We aren't instantiating this class anywhere (MEF is doing it for us), so you shouldn't have to update anything else.
Next, you'll want to add a dropdown to your UI that allows you to select which bot should be used. Do something like this in MainWindow.xaml (put it anywhere you want in the UI!):
<ComboBox
    Grid.Column="1"
    Margin="0,4"
    VerticalContentAlignment="Center"
    SelectedItem="{Binding Path=CurrentBot, Mode=TwoWay}"
    ItemsSource="{Binding Path=Bots, Mode=OneWay}">
    <ComboBox.ItemTemplate>
        <DataTemplate>
            <TextBlock>
                <TextBlock.Text>
                    <MultiBinding StringFormat="{}{0}">
                        <Binding Path="Name"/>
                    </MultiBinding>
                </TextBlock.Text>
            </TextBlock>
        </DataTemplate>
    </ComboBox.ItemTemplate>
<</ComboBox>
Next, make sure you have this in MainViewModel.cs::
IBot currentBot;
public IBot CurrentBot
{
    get => currentBot;
    set
    {
        currentBot = value;
        OnPropertyChanged(nameof(CurrentBot));
    }
}

...
Also, don't forget to update your Start and Stop commands to reference the new currentBot field, instead of the previous bot field.
Note that demo recordings may not include the dropdown with multiple bot support, so don't be confused if my UI looks different from yours. I recorded those videos using an earlier version of the bot.