Bloog Bot
DLL Injection

OK, now we finally get to the good part. The goal of this section is to demonstrate how to inject our bot into BloogsQuest's process, and invoke functions in BloogsQuest from our bot. Before we do that, we've got to make a small change to BloogsQuest, because currently there aren't any functions to call.
#include "stdafx.h"
#include <iostream>
#include <windows.h>

struct Player
{
    int level;
    int health;

    // new yell function
    void yell()
    {
        std::cout << "Raaghgghh!!!!" << std::endl;
    }
};

struct Game
{
    Player *player;
};

Game *pGame;
int main()
{
    pGame = new Game;
    pGame->player = new Player;
    pGame->player->level = 1;
    pGame->player->health = 100;

    INPUT_RECORD event;
    HANDLE hStdIn = GetStdHandle(STD_INPUT_HANDLE);
    DWORD count;

    std::cout << "Welcome to Bloog's Quest!" << std::endl;
    std::cout << "Player is level 1 and has 100 health." << std::endl << std::endl;

    while (true)
    {
        // handle user input
        if (WaitForSingleObject(hStdIn, 0) == WAIT_OBJECT_0)
        {
            ReadConsoleInput(hStdIn, &event, 1, &count);

            if (event.EventType == KEY_EVENT && !event.Event.KeyEvent.bKeyDown)
            {
                switch (event.Event.KeyEvent.wVirtualKeyCode)
                {
                case VK_SPACE:
                    // call the new yell function when the spacebar is pressed
                    pGame->player->yell();
                    pGame->player->health--;
                    std::cout << "After taking 1 damage, Player's remaining health is: "
                        << pGame->player->health << std::endl;
                    break;
                case VK_ESCAPE:
                    return 0;
                }
            }
        }

        // update simulation

        // render graphics
    }
}
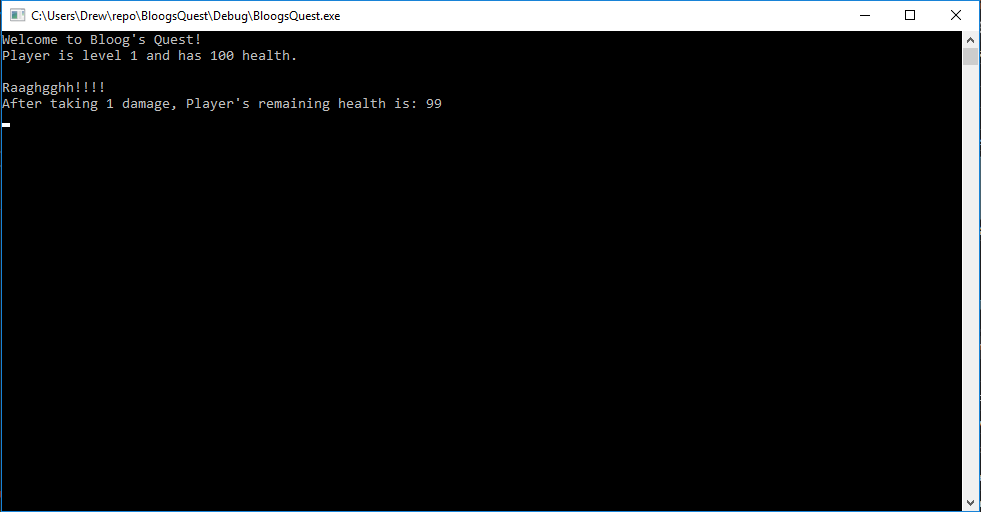
We've given the Player struct a function named yell that prints some text to the console. To test that it's working, we've also called the yell function whenever you press the space bar. Give it a try:
OK. Now we're ready to talk about DLL injection. We're going to be pulling in a few more functions from the Windows API. We'll also be converting BloogBot from a console application to a WPF application so we a nicer GUI to work with. Additionally, we have a big problem. BloogsQuest is written in C++, but we're writing BloogBot in C# which runs on the .NET framework. BloogsQuest hasn't loaded the .NET runtime, so if we inject our C# DLL into BloogsQuest, BloogBot won't have access to the .NET runtime it depends on. This means we're going to need a separate Loader that first bootstraps the .NET runtime, then invokes BloogBot.exe at its entry point. So instead of injecting BloogBot into BloogsQuest's process, we're going to inject the Loader which will then load BloogBot from within BloogsQuest's process. We're also going to create a Bootstrapper console application that is responsible for starting our game in a new process, then injecting Loader.dll into that process.
I won't be showing the code for the Loader, but if you're interested in building one yourself, I encourage you to check out the following resources:
- Injecting .NET Assemblies into Unmanaged Processes
- Grayfrost - C++ DLL Bootstrapper for spinning up the CLR for C# Payloads
Here's the high level overview of our strategy:
- Create a Bootstrapper console application that will inject Loader.dll into BloogsQuest's process
- Loader.dll will bootstrap the .NET runtime into BloogsQuest's process
- Loader.dll will then invoke the entry point of BloogBot.exe
- The result will be BloogsQuest running in a console window, and BloogBot's GUI open, running within the BloogsQuest process
First let's show the Bootstrapper project (comments explain what's happening at a high level). We've imported a few new functions from kernel32.dll. I've pulled those out into a separate WinImports class to keep things organized. I won't be showing that class; it's just a bunch of DllImports like we've seen in previous sections. If you want to learn more about how those functions work, you're a quick Google search away from reading about them in the Microsoft docs. For clarity, I'll list all the kernel32.dll function imports, followed by the entrypoint of the Bootstrapper project:
CreateProcessGetProcAddressGetModuleHandleVirtualAllocExVirtualFreeExWriteProcessMemoryCreateRemoteThread
using System;
using System.Diagnostics;
using System.IO;
using System.Reflection;
using System.Text;
using static Bootstrapper.WinImports;

namespace Bootstrapper
{
    class Program
    {
        const string PATH_TO_GAME = @"C:\BloogsQuest\BloogsQuest.exe";

        static void Main()
        {
            var startupInfo = new STARTUPINFO();

            // run BloogsQuest.exe in a new process
            CreateProcess(
                PATH_TO_GAME,
                null,
                IntPtr.Zero,
                IntPtr.Zero,
                false,
                ProcessCreationFlag.CREATE_DEFAULT_ERROR_MODE,
                IntPtr.Zero,
                null,
                ref startupInfo,
                out PROCESS_INFORMATION processInfo);

            // this seems to help prevent timing issues
            Thread.Sleep(500);

            // get a handle to the BloogsQuest process
            var processHandle = Process.GetProcessById((int)processInfo.dwProcessId).Handle;

            // resolve the file path to Loader.dll relative to our current working directory
            var loaderPath = Path.Combine(currentFolder, "Loader.dll");

            // allocate enough memory to hold the full file path to Loader.dll within the BloogsQuest process
            var loaderPathPtr = VirtualAllocEx(
                processHandle,
                (IntPtr)0,
                loaderPath.Length,
                MemoryAllocationType.MEM_COMMIT,
                MemoryProtectionType.PAGE_EXECUTE_READWRITE);

            // this seems to help prevent timing issues
            Thread.Sleep(500);

            // write the file path to Loader.dll to the BloogsQuest process's memory
            var bytes = Encoding.Unicode.GetBytes(loaderPath);
            var bytesWritten = 0; // throw away
            WriteProcessMemory(processHandle, loaderPathPtr, bytes, bytes.Length, ref bytesWritten);

            // search current process's for the memory address of the LoadLibraryW function within the kernel32.dll module
            var loaderDllPointer = GetProcAddress(GetModuleHandle("kernel32.dll"), "LoadLibraryW");

            // this seems to help prevent timing issues
            Thread.Sleep(500);

            // create a new thread with the execution starting at the LoadLibraryW function,
            // with the path to our Loader.dll passed as a parameter
            CreateRemoteThread(processHandle, (IntPtr)null, (IntPtr)0, loaderDllPointer, loaderPathPtr, 0, (IntPtr)null);

            // this seems to help prevent timing issues
            Thread.Sleep(500);

            // free the memory that was allocated by VirtualAllocEx
            VirtualFreeEx(processHandle, loaderPathPtr, 0, MemoryFreeType.MEM_RELEASE);
        }
    }
}
This article does a very good job of explaining the basics of DLL injection, but I'll briefly explain what's happening.
- Call
CreateProcessto start BloogsQuest.exe in a new process - Call
VirtualAllocExto allocate enough memory to store to the full file path to Loader.dll in the BloogsQuest process - Call
WriteProcessMemoryto write the full file path to Loader.dll in the memory we allocated above - Call
etModuleHandleto get the memory address of the kernel32 module in the current Bootstrapper process, and pass that in toGetProcAddress, along with theLoadLibraryWfunction name, to find the memory address of theLoadLibraryWfunction within the current Bootstrapper process - Call
CreateRemoteThread, passing in the memory address of theLoadLibraryWfunction as the starting point for the thread, and the address of our Loader.dll file path as a parameter - this will create a new thread which will start execution by callingLoadLibraryW, which will in turn load Loader.dll - Call
VirtualFreeExto free the memory that we allocated earlier withVirtualAllocEx
And here's the entry point for our WPF application which will serve as the GUI for our bot:
using System;
using System.Diagnostics;
using System.Windows;

namespace BloogBot
{
    public partial class App : Application
    {
        protected override void OnStartup(StartupEventArgs e)
        {
            Debugger.Launch();

            var mainWindow = new MainWindow();
            Current.MainWindow = mainWindow;
            mainWindow.Closed += (sender, args) => { Environment.Exit(0); };
            mainWindow.Show();

            base.OnStartup(e);
        }
    }
}
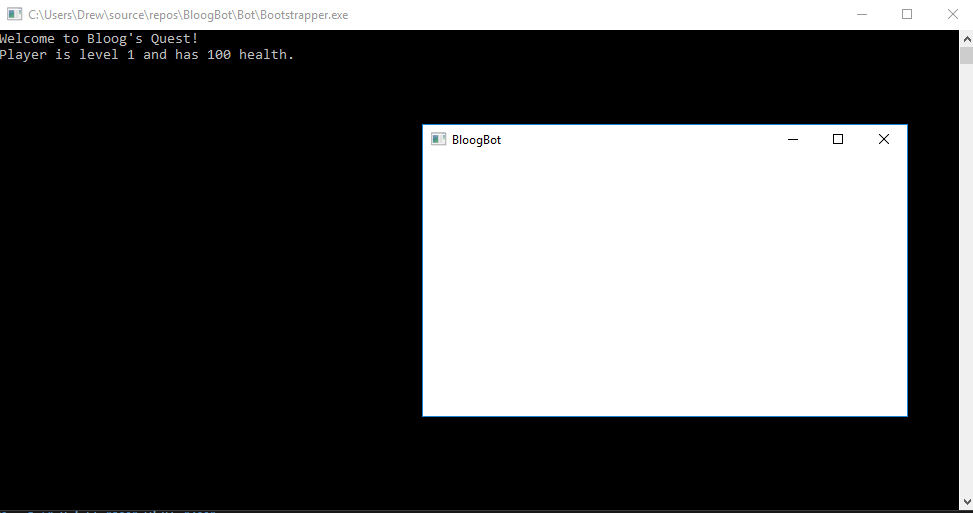
This will simply create our empty MainWindow. The one interesting bit here is Debugger.Launch(). Because we're invoking our WPF application indirectly through the Windows API, as opposed to launching the application with the debugger in Visual Studio, we won't have a debugger attached to the process. The Debugger.Launch() call will prompt us to attach a debugger which can be helpful. I also have the build output for the BloogBot WPF project and the Bootstrapper console application project set to a specific location (you can change the build configuration in the project settings for each individual project). Bootstrapper.exe assumes Loader.dll will be in its same folder, and Loader.dll assumes BloogBot.exe will be in its same folder, so I have the output folder of both projects set to "..\Bot\", and I manually dropped Loader.dll (our .NET runtime bootstrapper) into that folder. You'll need Visual Studio running with administrator privileges (or you'll need to invoke Bootstrapper.exe with administrator privileges if you're running it outside of Visual Studio). When you run Bootstrapper you'll see this:
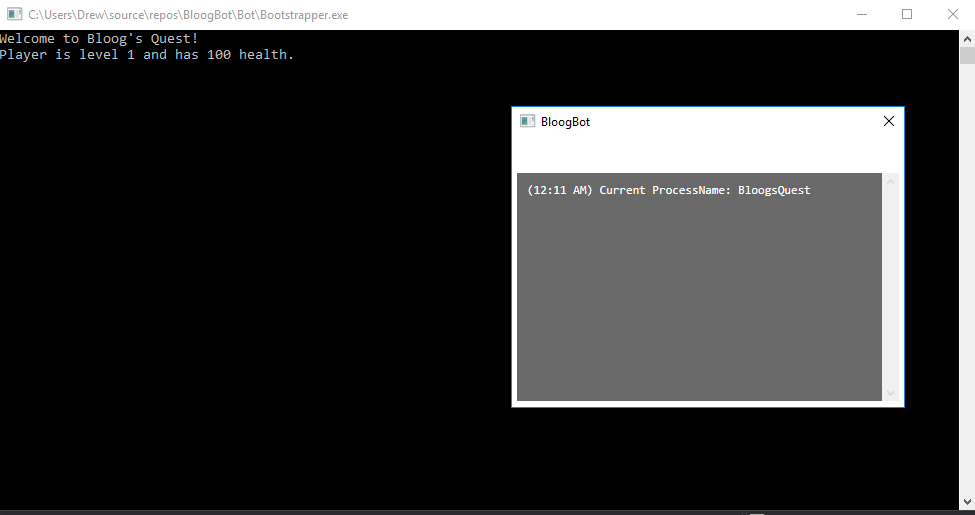
And just to confirm that BloogBot.exe is in fact running within the same process as BloogsQuest.exe, let's add some debug text to our WPF window (note - I won't be showing much of the WPF code because that's really not very interesting):
We're finally at the point that we can achieve the goal we initially set out to accomplish - calling a function in the BloogsQuest application from BloogBot. To do so, we're going to have to use some skills we've developed over the last few sections. Our target is the Player's yell function.
First, we need to find the memory address of the new yell function, then we need to import that function as an extern method using DllImport in BloogBot. In order to find the memory address for the yell function we're going to use Cheat Engine again, although our process will be a bit different.
As discussed earlier, structs and classes in C++ have their fields laid out in memory in a predictable way relative to the start of the object. Member functions on the other hand live somewhere entirely different. Consider the scenario where you instantiate 10 Player objects. All of those Players should have separate level and health values, but duplicating the yell function in memory would be wasteful. So instead of duplicating functions in memory for every Player object on the heap, the loader puts one copy of the yell function in the readonly text segment of memory. This is nice for us, because that text segment doesn't change between runs of our program, so we'll be able to find a static pointer to that function. Let's do that now.
Fire up Cheat Engine, then fire up BloogsQuest and attach Cheat Engine to the process. We're going to have to think about how to find this a bit differently than before. Consider the following line of code from the BloogsQuest source code that we use to call the yell function: pGame->player->yell();
We're going through the pointer to the Game object, then through the pointer to the Player object to call the yell function. What's happening under the hood here can be summarized like:
- Dereference memory address of
pGamevariable to get memory address of Game object - Dereference memory address of
playervariable to get memory address of Player object - Call
yellfunction
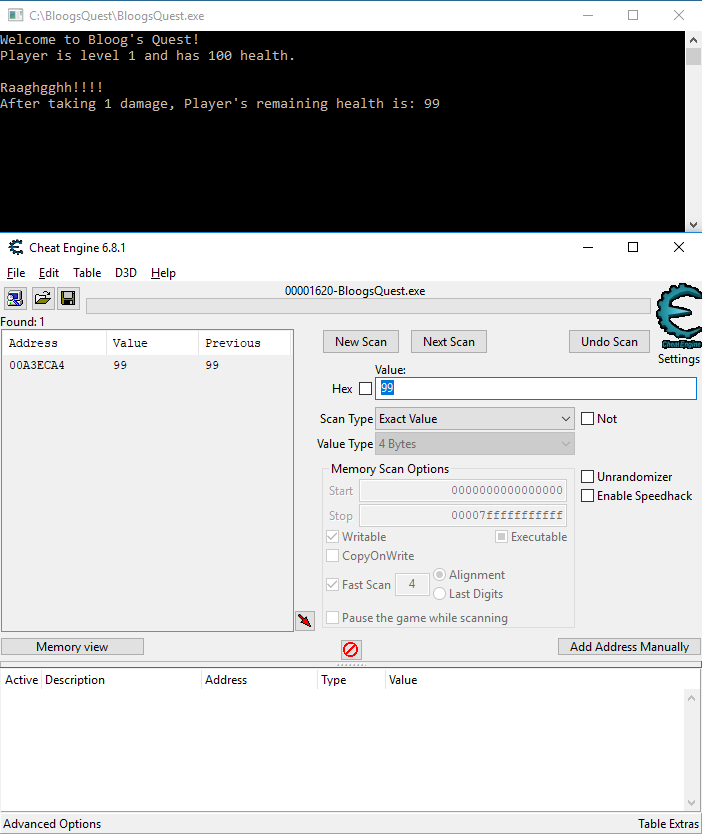
So we know that the line of code above will read from the memory address that our Player pointer is stored in. We can use this to our advantage. In Cheat Engine, we're going to start exactly how we did before and find the Player's health. Search for 100, drop the Player's health by 1 in BloogsQuest to find the memory address that stores the Player's health value:
We know that the Player object starts 4 bytes before the Player health address, but for the sake of thoroughness, let's add the Player's health address to the table at the bottom, right click -> "Find out what accesses this address", attach the debugger, drop the Player's health again, and identify the correct memory address to search for:
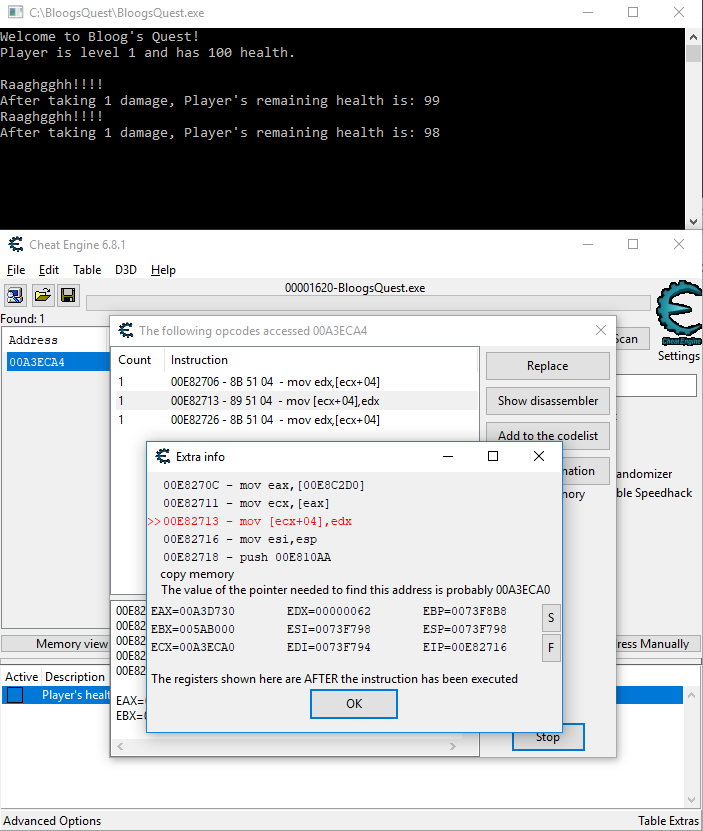
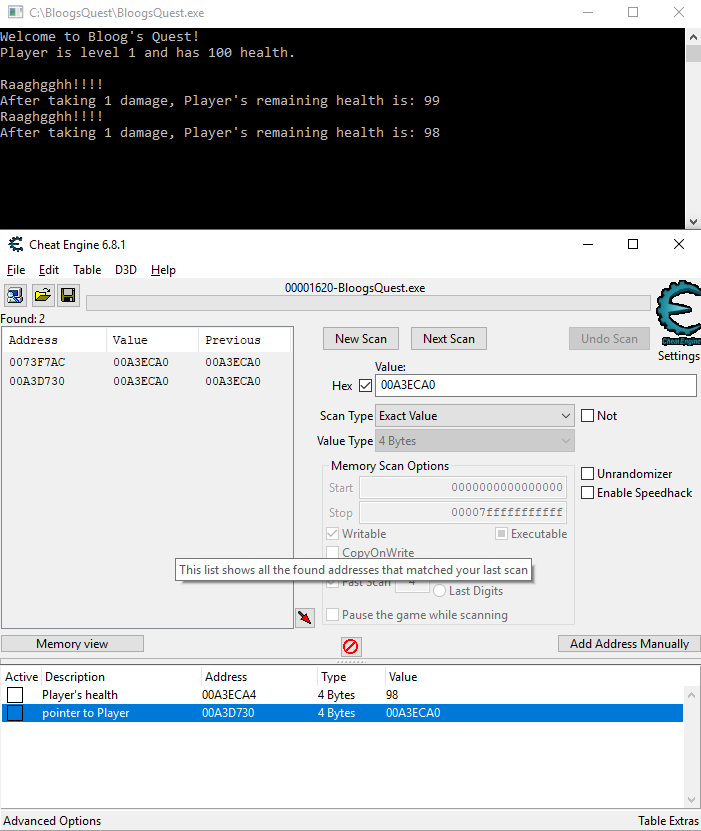
In my case, the Player object starts at memory address 00A3ECA0 (remember that this will change every time, so you'll see a different value if you're following along). Just like before, click New Scan, check the Hex checkbox, and search Exact Value/4 Bytes for 00A3ECA0. You'll get 2 hits, but remember to choose the one closest to the memory address we searched for. This new address is where the pointer to the Player object is stored. Add this to the table at the bottom:
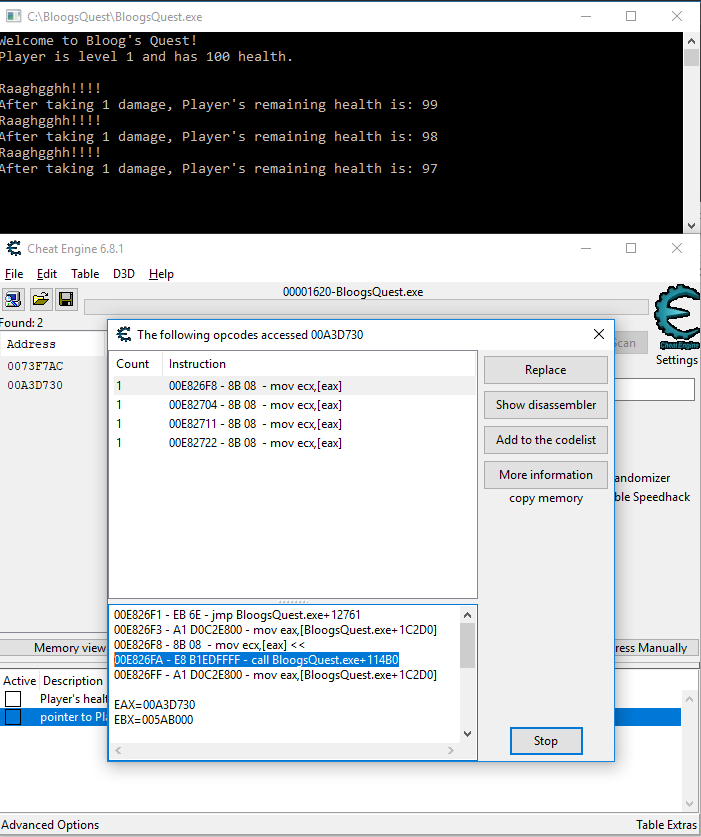
This is where we will deviate from before. Right click the pointer to Player address in the table at the bottom, and click "Find out what accesses this address". Your debugger should already be attached, so go back to BloogsQuest and drop the Player's health again to populate the opcode window. You'll see 4 instructions. Click on the first instruction in the list. This will show us the two instructions before and after it. Notice the call instruction? That's the Call Procedure instruction. That's promising. The target of the call procedure instruction is a static offset from the base address: BloogsQuest.exe+114B0.
Let's look at what's stored at that memory address. To do so, right click the first instruction and select "Show this address in the disassembler". From there, hit CTRL+G to pull up the Goto Address modal and enter BloogsQuest.exe+114B0 (Cheat Engine is kind enough to allow us to use the name of the process, and it'll resolve to the base address of that process).
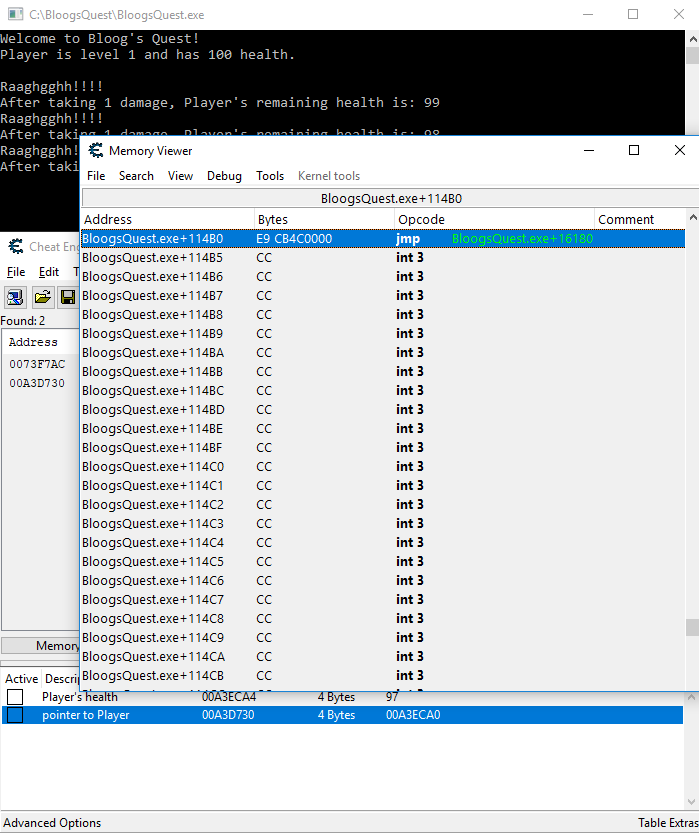
This memory address has a jmp instruction to BloogsQuest.exe+16180. Hit CTRL+G again and search for BloogsQuest.exe+16180. From there, right click the address BloogsQuest.exe+16180 and choose "Select current function":
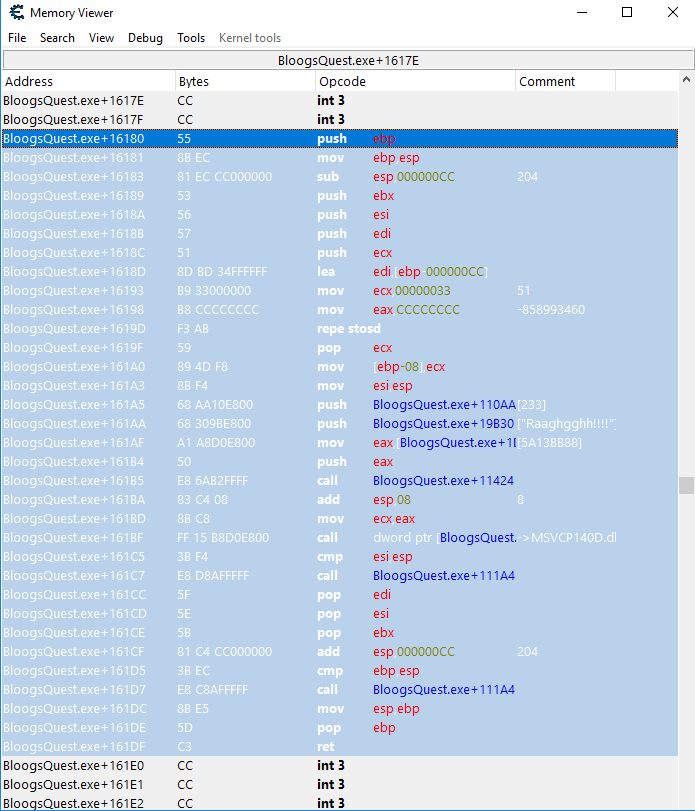
See our string literal "Raaghgghh!!!!"? I'm not an assembly guru, but this looks a lot like a function that would print that string to the console. At this point I feel confident enough that our yell function is stored at BloogsQuest.exe+114B0. And because these instructinos are stored in the text segment of memory, we know they won't change position if we close and reopen our game. Now we're ready to go back to BloogBot and write the code that will import the yell function.
First we're going to add a button to our GUI that we'll be able to click to invoke the yell function in BloogsQuest (again, I'm going to gloss over the details of the WPF code because it's far less interesting). Then I'll create a new Functions class that will be responsible for wiring up the function calls into unmanaged code. Take a look at the code:
using System.Diagnostics;
using System.Runtime.InteropServices;

namespace BloogBot
{
    public class Functions
    {
        const int YELL_FUNCTION_OFFSET = 114B0;

        //[UnmanagedFunctionPointer(CallingConvention.Cdecl)]
        delegate void YellDelegate();

        YellDelegate YellFunction;

        public Functions()
        {
            YellFunction = Marshal.GetDelegateForFunctionPointer(
                Process.GetCurrentProcess().MainModule.BaseAddress + YELL_FUNCTION_OFFSET,
                typeof(YellDelegate)) as YellDelegate;
        }

        internal void Yell() => YellFunction();
    }
}
The most important part of this snippet is the method GetDelegateForFunctionPointer. That's part of the System.Runtime.InteropServices namespace that allows us to wire up a delegate with an unmanaged function pointer. The first parameter we pass in is the memory address of that unmanaged function (BaseAddress + 114B0 in this case). Remember, at this point we've injected BloogBot into the BloogsQuest process, so we're able to use MainModule.BaseAddress to get the base address of BloogsQuest. The actual delegate we're wiring the fuction up with is defined toward the top of the class. You'll notice I have a single line of code commented out. That's to demonstrate an important note about calling conventions.
C++ specifies a number of different calling conventions. The primary differences between these calling conventions relates to how arguments are passed to and returned from functions (whether on the stack or in CPU registers, or some combination of both), and whether the caller or callee is responsible for cleaning up the call stack. The details aren't relevant to us at this point, but there are a few important things to note here. The Visual Studio C++ compiler defaults to a calling convention known as "Cdecl". However, the .NET method GetDelegateForFunctionPointer defaults to a calling convention known as "Stdcall". This mismatch could cause problems, but in our case, the yell function doesn't accept any parameters, and it doesn't return any values, so it really doesn't matter which calling convention we specify for our delegate. This does become important later on when you're working with more complicated functions, but for now we don't have to worry about it. Nonetheless, it's probably a good idea to uncomment that line of code to be explicit about our intentions.
Finally, we wire up our delegate with the unmanaged function in the constructor for our Functions class. With that done, let's see a truncated version of what our WPF code looks like:
namespace BloogBot
{
    public class MainViewModel : INotifyPropertyChanged
    {
        Functions functions;

        ICommand yellCommand;

        public ICommand YellCommand =>
            yellCommand ?? (yellCommand = new CommandHandler(Yell, true));

        public MainViewModel()
        {
            ...

            functions = new Functions();
        }

        public void Yell() => functions.Yell();

        ...
    }

    ...
}
We have a single method called Yell that's wired up with a Yell button in our GUI. That Yell command simply calls out to the Yell delegate on our Functions object. At this point we're ready for a test. Make sure Bootstrapper is set as your startup project, and start it up. You'll first see BloogsQuest open in a console window, followed by BloogBot's WPF GUI. Clicking the Yell button in our GUI should invoke the yell function in BloogsQuest and print some text to the console:
Very cool! This is obviously a contrived example with a very simple game, but these concepts are fundamental to building an in-process bot for more complicated games. At this point, it's worth pointing out that most multiplayer games these days come equipped with anti-cheat software that is often very sophisticated. This technique of DLL injection would likely be detected by old versions of the WoW client, and most definitely by the most recent WoW client. There are more complicated methods of DLL injection that are better at circumventing detection, but we're going to punt on that conversation for now.
Blizzard's anticheat is called Warden, with which WoW is indeed armed. It has both a server-side and client-side component. Warden has a few different scans that it's capable of performing. It can scan the WoW client's process to make sure you haven't overwritten anything in memory (this would catch obvious cheats, in the same vein as our first cheat that gave the player a ton of health: things like water walking, teleportation, etc). Warden also has a module scan that scans all the modules that have been loaded into the current process to detect anything that shouldn't be there. Warden is also very impressive in that the scans it does are controlled by packets sent from the server. So it's possible that one day you log in and there's a completely new scan that you haven't prepared for which could allow the server to detect your bot.
There are techniques that have been developed to circumvent detection from Warden. Using assembly injection, it's possible to detour calls to certain Windows API functions that are used by Warden to scan your WoW process, and reroute them to a function that "cleans up" your client, before routing the function call back to the appropriate place. Warden's module scan for example uses the Module32First and Module32Next functions from the Windows API, so by detouring those functions we can hide our injected modules from Warden. It's possible I'll write more about Warden down the road, but my understanding of Warden is fuzzy and frankly, the finer details of Warden circumvention go beyond my understanding of the WoW client, but if you're curious, hackmag wrote an excellent article on the topic. That being said, we will address any necessary obfuscation techniques as they arise throughout the rest of the discussion.
At this point, we're going to ditch BloogsQuest and move over to the WoW client. Due to the fact that old versions of the WoW client have been reverse engineered by a lot of very smart people, and their research is well documented, we're going to focus less on finding the necessary memory addresses and move on to more interesting problems. If you find yourself working with an application that isn't as well documented as something like the WoW client, the techniques we explored in the last few sections should be a good starting place.
In order to keep our attention focused on development of our bot, I don't want to muddy the waters by having to think about avoiding detection from Warden. Therefore instead of working against a live server, we're going to run our own local copy of the WoW server. There are a few open source implementations of the WoW server, but we're going to use MaNGOS. If you're following along, before moving on to the next section, install and configure the MaNGOS Zero server (there are multiple versions of MaNGOS that emulate the different WoW expansions - Zero is Vanilla, or patch 1.12.1) and make sure you can connect to it from the WoW client over your local network. The MaNGOS website has installation guides for Linux and Windows.
One quick site note about our Loader.dll. As I mentioned above, the Loader is responsible for bootstrapping the .NET runtime in our game, and then loading our bot into memory and starting executing at it's entry point. Due to the nature of WPF applications, we need to modify the entry point of our bot. Take a look at the code below:
using System.Threading;

namespace BloogBot
{
    class Loader
    {
        static Thread thread;

        static int Load(string args)
        {
            thread = new Thread(App.Main);
            thread.SetApartmentState(ApartmentState.STA);
            thread.Start();
            return 1;
        }
    }
}
As a quick recap - we have Loader.dll, a small C++ program that we first inject into the WoW process. This is responsible for bootstrapping the .NET runtime, and then pulling in BloogBot. Execution of BloogBot starts at the Loader.Load method above. The first important thing to note is that it maintains a static Thread field. It's important that this is static because it prevents it from going out of scope and getting garbage collected after this method returns.
The second important thing to note is the line thread.SetApartmentState(ApartmentState.STA). This stackoverflow post has a good explanation of ApartmentState. I haven't done much COM programming, so I don't understand exactly what's happening under the hood, but suffice it to say that because we're invoking a WPF application in a rather roundabout way, we need to specify the thread that our GUI will be running in has an apartment state of STA (Single Threaded Apartment).
Lastly, you'll notice the line thread = new Thread(App.Main). This is actually the entry point of our WPF application that should look more familiar.
With that out of the way, our first task is to modify our Bootstrapper project slightly to load the WoW client instead of BloogsQuest. From there, we'll identify the memory addresses of some key data structures and fuctions in the WoW client that allow us to display our character's properties in the BloogBot GUI, and enumerate all objects currently visible to the player.
UPDATE: Many folks have asked me what Library.dll looks like. I strongly encourage you to go through the exercise of reading the suggested links at the top of this article, but if you're stuck, I uploaded my code for Loader.dll to Google Drive here. Credit goes to Zzuk for this Loader library code. Note that I don't have a C++ project in my solution for this Loader library, because I essentially ripped it off from Zzuk and compiled it as part of a different solution, so I just drop it into the BloogBot build output folder. Also, don't be confused by the fact that we have both Loader.dll, as well as a class called Loader.cs in the BloogBot project. Loader.dll is actually responsible for bootstrapping the .NET framework in our process and all that jazz, while Loader.cs is the actual entry point for our bot's execution once it has been injected into the process. So you absolutely need both!
UPDATE 2/24/2021: a number of folks have expressed confusion about why their Loader library does not seem to be working. The most common issue that I see is that the C# projects in your solution are configured to compile against the "Any CPU" or "x64" build configurations. It's very important that you target the "x86" target platform if you're following this tutorial. C++ projects, by default, will target a 32bit platform. And the vanilla WoW client is also a 32 bit process. So every project in your solution should target a 32bit platform. In practice, this means you will have to manually update your C# project properties to change the default "Any CPU" to "x86".