Bloog Bot
Recast / Detour
Pathfinding is a fascinating concept with its foundation based on computer science fundamentals like Graph Theory. There's a problem I saw frequently when I was preparing for job interviews - at its core it was a graph traversal problem, but certain cells of the matrix were "blocked" - you couldn't traverse them. Instead, you had to move around them. Given those rules, the goal was to write an algorithm that found the shortest path between two cells in the matrix that didn't move through "blocked" cells. Now, imagine our bot. He's moving through the world, trying to get from one point to another, but certain terrain is "blocked" - trees, buildings, or other obstables can't be walked through - they need to be avoided. The problem is nearly identical. So how do we go about solving it?
I don't know about you, but I'm lazy. Interviewing sucked, and I don't really get much enjoyment from solving graph traversal problems. Thankfully, somebody much smarter than myself created a pair of open source libraries that solves our problem perfectly: Recast/Detour. This project is truly amazing. There are two primary parts that I'll do my best to summarize.
The first piece is Recast. The purpose of Recast is to take the static geometry of the game's terrain and convert it into a Navigation Mesh. A nav mesh is a data structure that provides a nice abstraction for solving graph traversal problems. Instead of writing algorithms ourselves to traverse the graph, a nav mesh exposes functions that allow us to pass in, for example, a start point and an end point, and it'll return a path that represents an optimized route between those two paths, taking into account any obstructions that have to be avoided. Recast's path generation functions also take an "angle" as an argument that allows you to specify the angle at which a player can no longer run up a steep surface (a hill for example). This will differ from game to game - in WoW, 60 degrees seems to be a sweet spot.
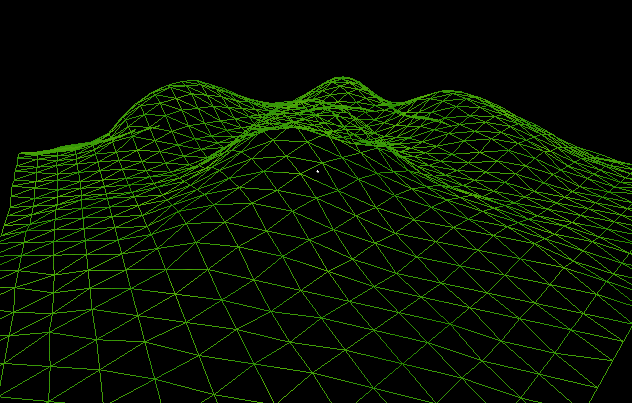
Somewhere in your WoW game client folder will be a set of files that represents the static geometry of the game world (earth, trees, buildings, etc). This is simply a set of points in 3D space that make up a mesh. The rendering engine uses this mesh when it renders the game world. We can take advantage of the existence of those files, and by feeding them into Recast, we can generate a navigation mesh that our bot can use to traverse the game world. The static geometry looks something like this when visualized in 3D coordinate space:
So if we want to use Recast to generate a navigation mesh, we need to first obtain WoW's terrain geometry so we can pass it into Recast for processing. WoW's terrain geometry isn't just stored in plain text - it's stored in an archive file format known as an MPQ file. It's not just terrain data that's stored in an MPQ file - models, sounds, speech, textures, etc are all stored in MPQ files. Take a look in your WoW game folder. In the Data subfolder you'll see a file called terrain.MPQ. This archive stores the static geometry for the entire game. Notice it's quite large - over 1gb. If you're curious, you can use an MPQ Editor to view the contents of these MPQ files to see what's inside. It's actually quite interesting. Here's what terrain.MPQ looks like:

Notice all the .ADT files? The file format is quite well documented at the wowdev.wiki site. From that site, let's note two important details:
- All maps are divided into 64x64 blocks for a total of 4096 (some of which may be unused).
- Each block is 533.33333 yards (1600 feet) in width and height. The map is divided into 64x64 blocks so the total width and height of the map will be 34133.33312 yards, however the origin of the coordinate system is at the center of the map so the minimum and maximum X and Y coordinates will be ±17066.66656).
So, at a very high level, the WoW game world can be summarized as follows:
- The game world is split up into different Maps. There are two primary continents known as "Kalimdor" and "Eastern Kingdoms". Each of these is a separate map. There are also a bunch of instanced areas - dungeons, battlegrounds, etc. Each of THESE also is a separate map.
- Maps are broken up into 64x64 grids of Tiles. Each tile is 533.33 yards (1600 feet) square.
- Map data is stored in
terrain.MPQ. The WoW client knows how to parse these .MPQ files at runtime so it can use the terrain geometry for rendering the game world, etc.
Note - if you look at the article I linked above on the .ADT file format, it's actually a bit more complicated than that. Each Tile is actually broken up into smaller chunks. These .ADT files represent the tile chunks. So you'd have to connect the data from multiple .ADT files together to get a Tile, and then connect multiple Tiles to get a Map.
Now that we understand at a high level how WoW's static terrain geometry is stored, the next big question is: what geometry data format does Recast expect as input? I linked the RecastNavigation repository on github earlier - there's actually a great demo included in the repo that shows how Recast can be used. Here's that demo. If you dig around, you'll see that this demo is actually loading an .obj file which is a file format that represents a 3D model. Ultimately, Recast expects a triangle mesh. In this case, the demo takes an .obj file and parses it to extract the mesh. You could just as easily hardcode an array of 3D vectors representing a set of triangles. In OUR case, we need to find a way to extract a set of triangle meshes from terrain.MPQ. How can we do that?
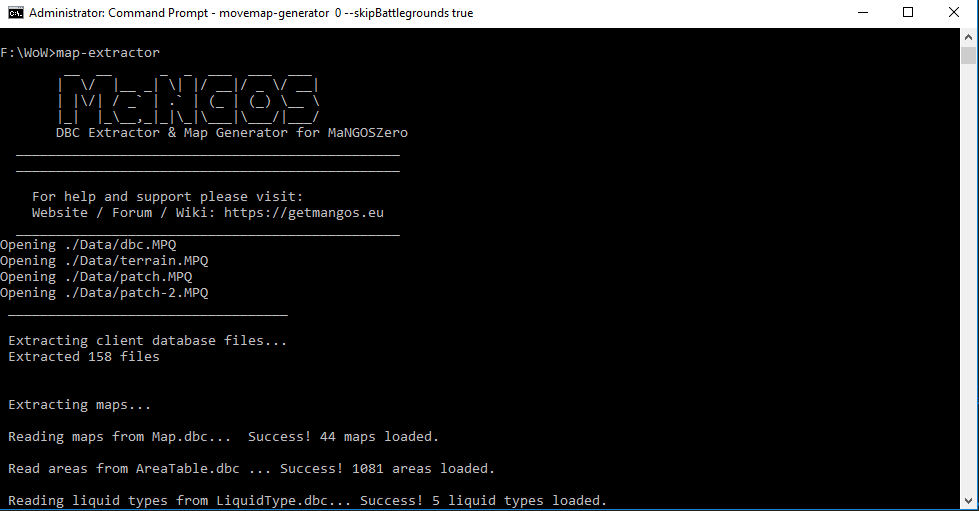
As amazing as Recast is, it's incredibly complicated, and the documentation is dense, giving this library a very steep learning curve. This is further complicated by the fact that before we can even use Recast, we need to first find a way to extract a set of meshes from the WoW client's terrain.MPQ file. Like I mentioned earlier, I'm lazy, and I don't like reinventing the wheel. Way earlier in this series I talked about MaNGOS Zero, which is an open source fully emulated World of Warcraft server. I'm currently running an instance of MaNGOS on my home network which is what I've been using to test the bot. The MaNGOS repository is going to be incredibly helpful to us in implementing pathfinding because it actually uses Recast/Detour to handle NPC pathfinding on the server! So the pathfinding library we're going to be implementing will look very similar to the one included in the MaNGOS code. In addition, the MaNGOS repo has a few utilities that make it incredibly easy to parse the game's terrain geometry with Recast. You can find those utilities here. You're going to have to pull down the codebase and compile the solution to get the executables for those utilities. If you'd rather not do that, I've uploaded the three necessary utilities to Google drive - you can get them here. Here's what these utilities are going to do for us at a high level:
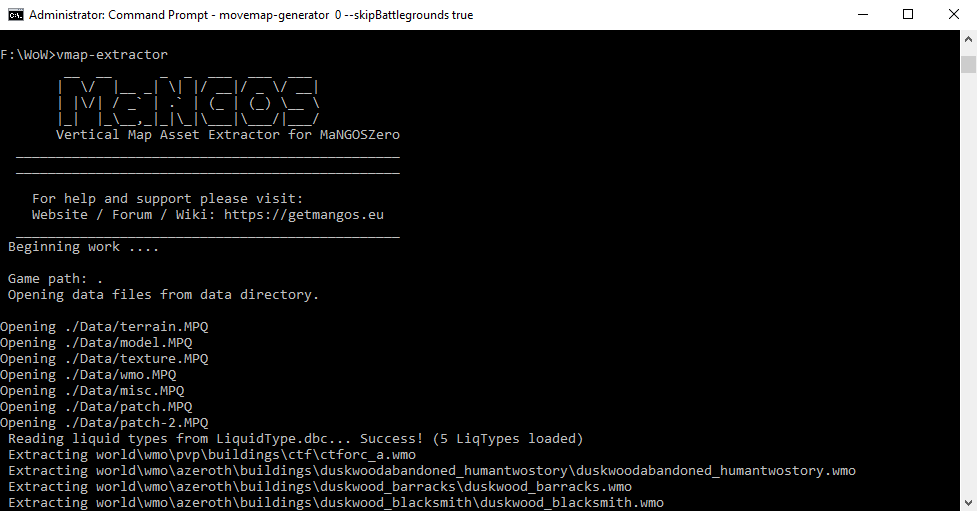
map-extractor.exewill parse terrain.MPQ to extract a set of triangle meshes and save them in a /maps folder.vmap-extractor.exewill parse terrain.MPQ to extract a set of "vision maps" and save them in a /vmaps. These are used by the WoW client to determine whether a character has line-of-sight to a target. These aren't explicitly required for pathfinding, but the third utility won't work unless these vmaps are present.movemap-generator.exewill use the files we generated in steps 1 and 2 to generate a series of Detour navigation meshes. Detour nav meshes actually consist of one or more tiles. So for each Map in the WoW client, this utility will export a single .mmap file, each with one or more associated .mmtile files.
Drop the three utilities into the same folder as your WoW executable. Open a command prompt, navigate to the WoW client's base folder, and first run map-extractor:
Next run vmap-extractor:
Finally, run movemap-generator 0 --skipBattlegrounds true. This will take quite some time - up to a few hours or more. Once it finishes, run movemap-generator 1 --skipBattlegrounds true.
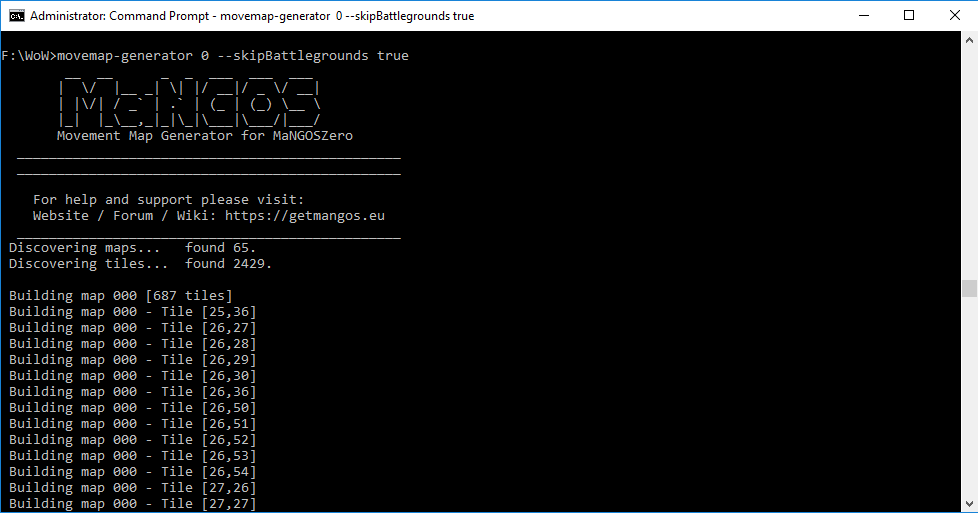
The 0 and 1 arguments specify we want to generate nav meshes for mapIds 0 and 1 respectively. These are the two major continents. The --skipBattlegrounds true argument does just what it sounds like - it skips generating nav meshes for the battlegrounds. Depending on your intentions, you may want to omit these arguments. My goal for the bot is to grind and level up, so he'll be spending 100% of his time in the two major continents. If you want your bot to work in instanced dungeons, or battlegrounds, you'll need to generate nav meshes for those areas as well. I'm omitting them because this process takes a long time.
Once movemap-generator finishes, you should see a /mmaps folder in your WoW game client folder with two .mmap files, and a bunch of associated .mmtile files. You can copy this entire folder into the BloogBot output folder. Mine is Repos/BloogBot/Bot.
I've clearly done some hand-waving here to avoid the complexity of Recast. If you want to learn more about Recast, check out some of the resources I linked earlier in this chapter. The RecastNavigation repository has a nice example of Recast being used. This demo project actually lets you visualize the navigation mesh that's been generated. I encourage you to check out this article where Michael Cutler actually wires up the WoW nav meshes with the RecastDemo project, so you can see what the game client's terrain geometry looks like in nav mesh form. Here's an image from that article:
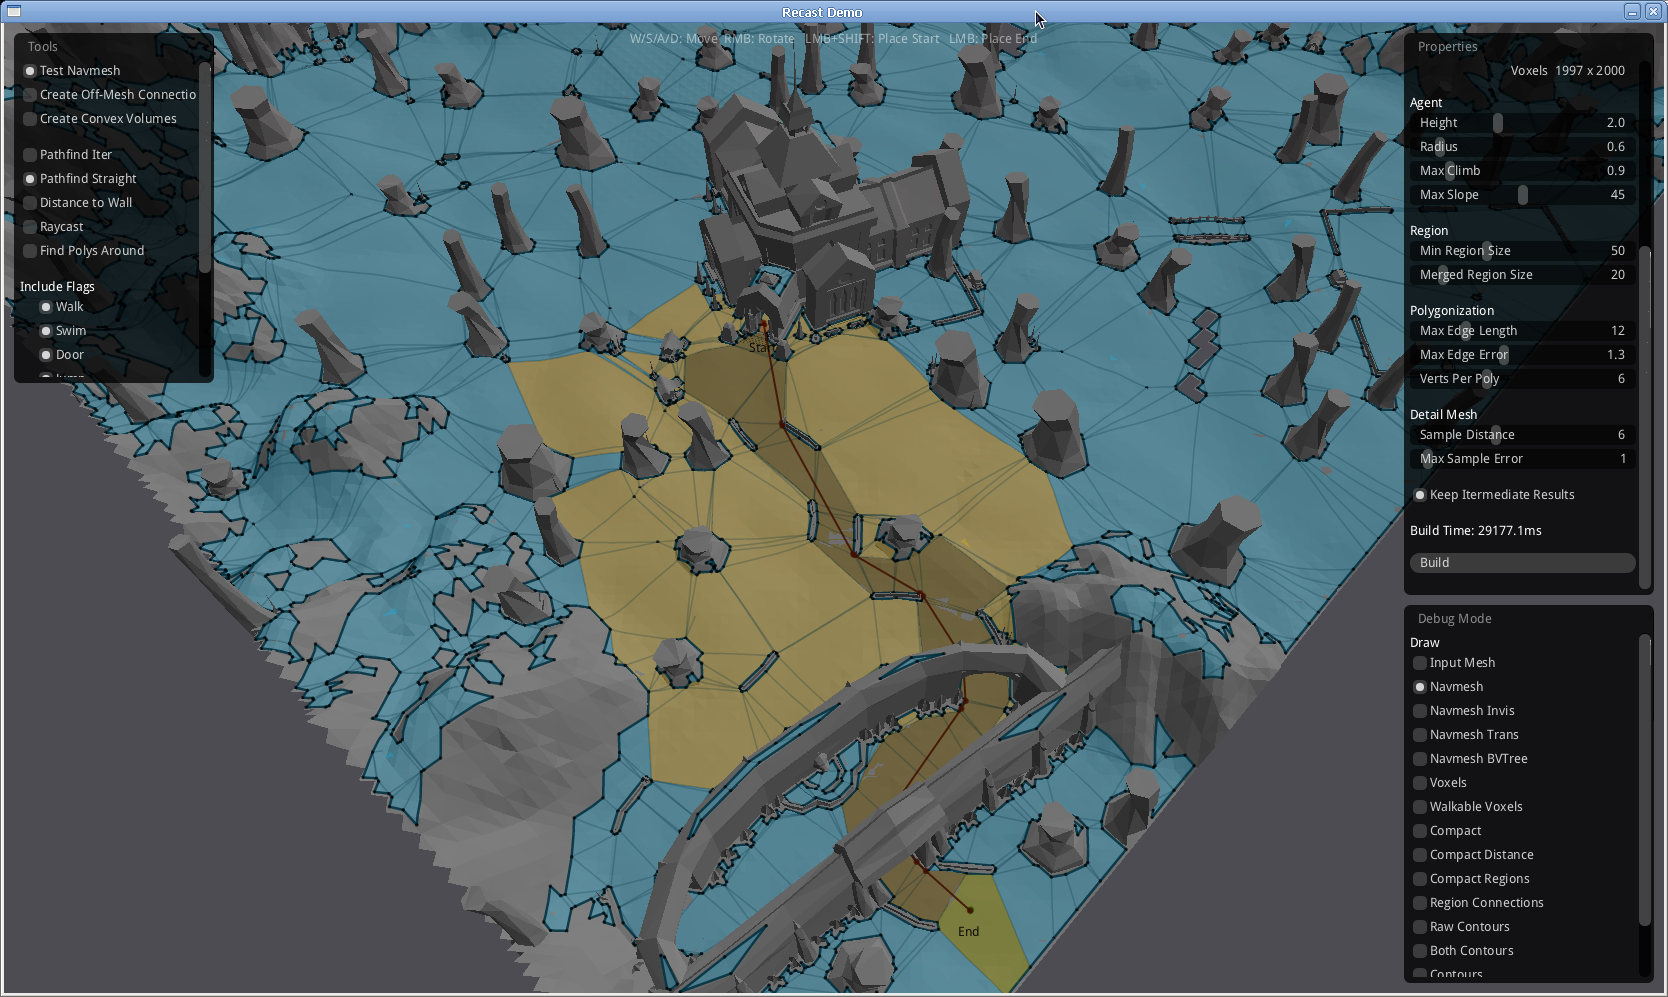
This is a single Tile from the Eastern Kingdoms Map. This is the RecastDemo project, and it provides a pretty cool visualization of the navigation mesh. It definitely helped me conceptualize how this stuff all worked. If you couldn't care less about Recast, the good news is we won't need to worry about it anymore. Simply drop the /mmaps folder in your /Bot folder, and you're all set.
Now it's time to talk about Detour. While Recast is used to generate the nav mesh, Detour provides the API to use the nav mesh. Like I mentioned earlier, we're lucky, because the folks at MaNGOS use Recast / Detour to handle their NPC's pathfinding behavior, so we have a great example of how to put our .mmap and .mmtile files to use. In the rest of this chapter we're going to build a Navigation library that roughly will do the following:
- Load all the .mmap and .mmtile files we generated with Recast into memory when the bot is injected into the WoW client
- Expose two functions:
CalculatePaththat will take a start and end point, and return an array that represent the path between those two points.FreePathArrthat will free the memory used to store the path after it's returned to the bot.- Under the hood, our Navigation library will call into Detour for its pathfinding capabilities.
We're also going to create a NavigationTests project that will allow us to test the Navigation library without injecting the bot into the WoW client. This will greatly speed up iteration time. There's going to be a lot of new code here. Also, full disclaimer: large portions of this code are blatantly ripped off from both the MaNGOS codebase, and Zzuk's vanilla WoW bot (blog here). For that reason, I'm going to be briefly glossing over a lot of this code, but I've uploaded the source code for both the Navigation and NagivationTests projects to Google drive here.
First, add the two projects to the solution. My solution currently looks like this:
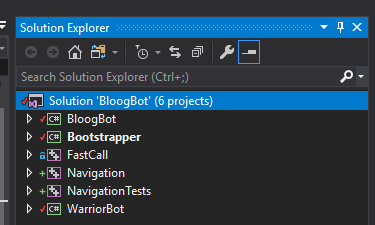
There are 4 main files here:
DllMain.cppis the entry point of our library.Navigation.cppis the main file that we'll be writing. This file will load the .mmap and .mmtile files and pass them toMoveMap.cpp, and will hold ourCalculatePathandFreePathArryfunctions.MoveMap.cppis ripped off from MaNGOS - it exposes a few data structures and functions to take our .mmap and .mmtile files and initialize the correct Detour nav mesh structures.PathFinder.cppis also ripped off from MaNGOS - this is where the bulk of the pathfinding logic lives using Detour's API.
The Navigation library has a number of external dependencies:
- Detour source (available from the Recastnavigation repo)
- A subset of G3D (a popular 3D engine written in C++) called g3dlite that you can find here in the MaNGOS repo. This library is used for vector math etc.
- Two misc. files from the MaNGOS repo:
UnorderedMapSet.handCompilerDefs.h.
I'm not going to go into detail about how to wire up the project dependencies, but if you download the projects I linked above, you can see how everything is configured. The Navigation library will output a single library Navigation.dll to the main /Bot folder. To start, let's look at the library's entry point in DllMain.cpp:
#include "Navigation.h"

#include <windows.h>
#include <stdio.h>

extern "C"
{
    __declspec(dllexport) XYZ* CalculatePath(unsigned int mapId, XYZ start, XYZ end, bool smoothPath, int* length)
    {
        return Navigation::GetInstance()->CalculatePath(mapId, start, end, smoothPath, length);
    }

    __declspec(dllexport) void FreePathArr(XYZ* pathArr)
    {
        return Navigation::GetInstance()->FreePathArr(pathArr);
    }
};

BOOL APIENTRY DllMain(HMODULE hModule, DWORD ul_reason_for_call, LPVOID lpReserved)
{
    Navigation* navigation = Navigation::GetInstance();
    switch (ul_reason_for_call)
    {
        case DLL_PROCESS_ATTACH:
            navigation->Initialize();
            break;

        case DLL_PROCESS_DETACH:
            navigation->Release();
            break;

        case DLL_THREAD_ATTACH:
            break;

        case DLL_THREAD_DETACH:
            break;
    }
    return TRUE;
}
Just like our FastCall library, we're exporting some functions using extern "C". These are the two functions that will be called from the bot. When the process attaches, we call navigation->Initialize(), and when the process detatches, we call navigation->Release(). One thing worth noting is the smoothPath parameter in the CalculatePath function. An optimal solution to a graph traversal problem is going to look "jerky", moving between points on the nav mesh. This will look very robotic. Thankfully Detour provides the ability to "smooth out" a path, making the path look more like a spline. 99% of the time we're going to use a smooth path, but we'll leave this as a parameter to the CalculatePath function in case we want the flexibility later on.
Next, let's look at Navigation.cpp. Here's the Initialize function that gets called when the library is first loaded:
void Navigation::Initialize()
{
    dtAllocSetCustom(dtCustomAlloc, dtCustomFree);

    MMAP::MMapManager* manager = MMAP::MMapFactory::createOrGetMMapManager();

    for (auto& p : directory_iterator(Navigation::GetMmapsPath()))
    {
        string path = p.path().string();
        string extension = path.substr(path.find_last_of(".") + 1);
        if (extension == "mmtile")
        {
            string filename = path.substr(path.find_last_of("\\") + 1);

            int xTens = filename[3] - '0';
            int xOnes = filename[4] - '0';
            int yTens = filename[5] - '0';
            int yOnes = filename[6] - '0';

            int x = (xTens * 10) + xOnes;
            int y = (yTens * 10) + yOnes;

            if (filename[0] == '0' && filename[1] == '0' && filename[2] == '0')
                manager->loadMap(0, x, y);
            else if (filename[0] == '0' && filename[1] == '0' && filename[2] == '1')
                manager->loadMap(1, x, y);
        }
    }
}

string Navigation::GetMmapsPath()
{
    WCHAR DllPath[MAX_PATH] = { 0 };
    GetModuleFileNameW((HINSTANCE)&__ImageBase, DllPath, _countof(DllPath));
    wstring ws(DllPath);
    string pathAndFile(ws.begin(), ws.end());
    char *c = const_cast(pathAndFile.c_str());
    int strLength = strlen(c);
    int lastOccur = 0;
    for (int i = 0; i < strLength; i++)
    {
        if (c[i] == '\\') lastOccur = i;
    }
    string pathToMmap = pathAndFile.substr(0, lastOccur + 1);
    pathToMmap = pathToMmap.append("mmaps\\");

    return pathToMmap;
}
dtAllocSetCustom is a function in Detour that initializes Detour's custom memory management functions. Then we use Navigation::GetMmapsPath() which resolves to the /Repos/BloogBot/Bot/mmaps folder, and we iterate over all the files in that folder. For each .mmtile file we find, we call MMapManager.loadMap which is defined in MoveMap.cpp. This loads all the .mmap and .mmtile files and initializes the necessary Detour nav mesh data structures. The three utilities we ran earlier to generate the .mmap and .mmtile files used a particular naming convention. The first three characters represent the mapId (001 is mapId 1, 302 is mapId 302). Remember how I mentioned that each Map in WoW was broken up into a 64x64 grid of Tiles? The last 4 characters of the filename represent the grid position. Characters 4 and 5 are the GriX position, and characters 6 and 7 are the GridY position. This Initialize function has some logic to parse the filename of each file in the mmaps folder and initialize the correct map tile accordingly. Next let's look at the CalculatePath function:
XYZ* Navigation::CalculatePath(unsigned int mapId, XYZ start, XYZ end, bool straightPath, int* length)
{
    PathFinder pathFinder(mapId, 1);
    pathFinder.setUseStrightPath(straightPath);
    pathFinder.calculate(start.X, start.Y, start.Z, end.X, end.Y, end.Z);

    PointsArray pointPath = pathFinder.getPath();
    *length = pointPath.size();
    XYZ* pathArr = new XYZ[pointPath.size()];

    for (unsigned int i = 0; i < pointPath.size(); i++)
    {
        pathArr[i].X = pointPath[i].x;
        pathArr[i].Y = pointPath[i].y;
        pathArr[i].Z = pointPath[i].z;
    }

    return pathArr;
}
This function uses an XYZ class defined in Navigation.h:
class XYZ
{
public:
    float X;
    float Y;
    float Z;

    XYZ()
    {
        X = 0;
        Y = 0;
        Z = 0;
    }

    XYZ(double X, double Y, double Z)
    {
        this->X = (float)X;
        this->Y = (float)Y;
        this->Z = (float)Z;
    }
};
The navigation path is going to be a collection of points in the game world, represented as 3D Vectors (X, Y, and Z coordinates), so this XYZ class will hold our nav path points. The CalculatePath function calls into some functions from PathFinder.cpp to generate the navigation path, then we create an array with the points that were returned. As I mentioned earlier, PathFinder.cpp and MoveMap.cpp are ripped off almost line for line from the MaNGOS Zero repository, so if you want to learn more about how Detour works, I encourage you to check out that part of the MaNGOS codebase. The Recastnavigation repository also has a DetourDemo project that shows how Detour can be used. Much like Recast, it's quite complicated, and I ripped off most of the code from MaNGOS, so I'm not going to show that code or talk about it much.
Finally, here's the FreePathArr function. It simply deallocates the memory we used to hold the path:
void Navigation::FreePathArr(XYZ* pathArr)
{
    delete[] pathArr;
}
Now, in order to test this, we'd have to start the bot, log into our account, and enter the world with our character, then call CalculatePath and look at the output. That's a pretty annoying process, and considering the complexity of Recast/Detour, if we ever want to modify this code, we want to be able to test it without constantly having to log into the game. That's the purpose of the NavigationTests project. The way we test the Navgitation library is going to be a bit different though. From the NavigationTests library, we can't just add aa reference to the Navigation library and call CalculatePath directly, because that function isn't actually exposed by the library. Instead, we use extern "C", because we're going to be calling these functions from our .NET bot. So much like we've done in the past, we need to load Navigation.dll using LoadLibrary, and get a reference to the CalculatePath function using GetProcAddress. Here's the single file from our NavigationTests library:
#include "..\Navigation\Navigation.h"
#include "CppUnitTest.h"
#include <windows.h>
#include <string>

using namespace Microsoft::VisualStudio::CppUnitTestFramework;
using namespace std;

namespace NavigationTests
{
    EXTERN_C IMAGE_DOS_HEADER __ImageBase;

    typedef XYZ*(__cdecl *f_calculatePath)(unsigned int, XYZ, XYZ, bool, int*);

    TEST_CLASS(NavigationTests)
    {
    public:
        TEST_METHOD(NavigationTest1)
        {
            HINSTANCE hGetProcIDDLL = LoadLibrary(GetNavigationDllPath());
            f_calculatePath calculatePathFunc = (f_calculatePath)GetProcAddress(hGetProcIDDLL, "CalculatePath");

            int length = 0;
            XYZ start = XYZ{ -2341.46, -378.072, -8.16762 };
            XYZ end = XYZ{ -2397.07, -384.831, -2.27768 };
            XYZ* navPath = calculatePathFunc(1, start, end, true, &length);

            Assert::IsTrue(length > 2);
        }
    private:
        const char* GetNavigationDllPath()
        {
            WCHAR dllPath[MAX_PATH] = { 0 };
            GetModuleFileNameW((HINSTANCE)&__ImageBase, dllPath, _countof(dllPath));
            wstring ws(dllPath);
            string path(ws.begin(), ws.end());
            path = path.substr(0, path.find_last_of("\\"));
            path = path.substr(0, path.find_last_of("\\"));
            path = path.substr(0, path.find_last_of("\\"));
            path = path.append("\\Bot\\Navigation.dll");

            return path.c_str();
        }
    };
}
I first logged into the game with the bot and found two locations not too far away from each other. We're using those two points for start and end. Then we just call CalculatePath and assert that the path is longer than 2 points. Why 2? Well, 2 is the minimum that Detour will return. If the library fails to find a path for whatever reason, it'll just return those two points, and the navigation path would just be a straight line between them. But ideally Detour should return a path with MORE than 2 points, which is what we're checking for. If length is greater than 2, we know that Detour successfully returned a path from the nav mesh.
Now, let's wire up the Navigation library with our bot. Create a new Navigation class in the BloogBot project that looks like this:
public static unsafe class Navigation
{
    [DllImport("kernel32.dll")]
    static extern IntPtr LoadLibrary(string lpFileName);

    [DllImport("kernel32.dll")]
    static extern IntPtr GetProcAddress(IntPtr hModule, string procName);

    [UnmanagedFunctionPointer(CallingConvention.Cdecl)]
    delegate XYZ* CalculatePathDelegate(
        uint mapId,
        XYZ start,
        XYZ end,
        bool straightPath,
        out int length);

    [UnmanagedFunctionPointer(CallingConvention.Cdecl)]
    delegate void FreePathArr(XYZ* pathArr);

    static CalculatePathDelegate calculatePath;
    static FreePathArr freePathArr;

    static Navigation()
    {
        var currentFolder = Path.GetDirectoryName(Assembly.GetExecutingAssembly().Location);
        var mapsPath = $"{currentFolder}\\Navigation.dll";
        var navProcPtr = LoadLibrary(mapsPath);

        var calculatePathPtr = GetProcAddress(navProcPtr, "CalculatePath");
        calculatePath = Marshal.GetDelegateForFunctionPointer(calculatePathPtr);

        var freePathPtr = GetProcAddress(navProcPtr, "FreePathArr");
        freePathArr = Marshal.GetDelegateForFunctionPointer(freePathPtr);
    }

    public static Position[] CalculatePath(uint mapId, Position start, Position end, bool straightPath)
    {
        var ret = calculatePath(mapId, start.ToXYZ(), end.ToXYZ(), straightPath, out int length);
        var list = new Position[length];
        for (var i = 0; i < length; i++)
        {
            list[i] = new Position(ret[i]);
        }
        freePathArr(ret);
        return list;
    }
}
Because we're working with pointers, we need to mark the class as unsafe. In the constructor, we initialize the library and functions using LoadLibrary and GetProcAddress just like we did from NavigationTests. The only other thing worth noting is that we have to call freePathArr after we've initialize the Position[]. The Navigation library doesn't know when we're done with the array that it's returned, so we need to explicitly free that memory when appropriate.
Before we test, we need a way of finding the current MapId of the player, because our new Navigation library depends on that. This can be found at an offset from the base pointer of the ObjectManager, so add the following code to our LocalPlayer class:
const int OBJECT_MANAGER_BASE = 0x00B41414;
const int OBJECT_MANAGER_MAP_ID_OFFSET = 0xCC;

public uint MapId
{
    get
    {
        var objectManagerPtr = MemoryManager.ReadIntPtr((IntPtr)OBJECT_MANAGER_BASE);
        return MemoryManager.ReadUint(IntPtr.Add(objectManagerPtr, OBJECT_MANAGER_MAP_ID_OFFSET));
    }
}
Let's add some test code in the Bot.Start method to make sure everthing is working correctly.
public void Start(string food)
{
    var target = ObjectManager.Units.FirstOrDefault(u => u.Guid == ObjectManager.Player.TargetGuid);
    if (target != null)
    {
        var path = Navigation.CalculatePath(ObjectManager.Player.MapId, ObjectManager.Player.Position, target.Position, true);
        Console.WriteLine(path.Length);
    }
    //running = true;
    //botStates.Push(new GrindState(botStates, food));
    //StartInternal();
}
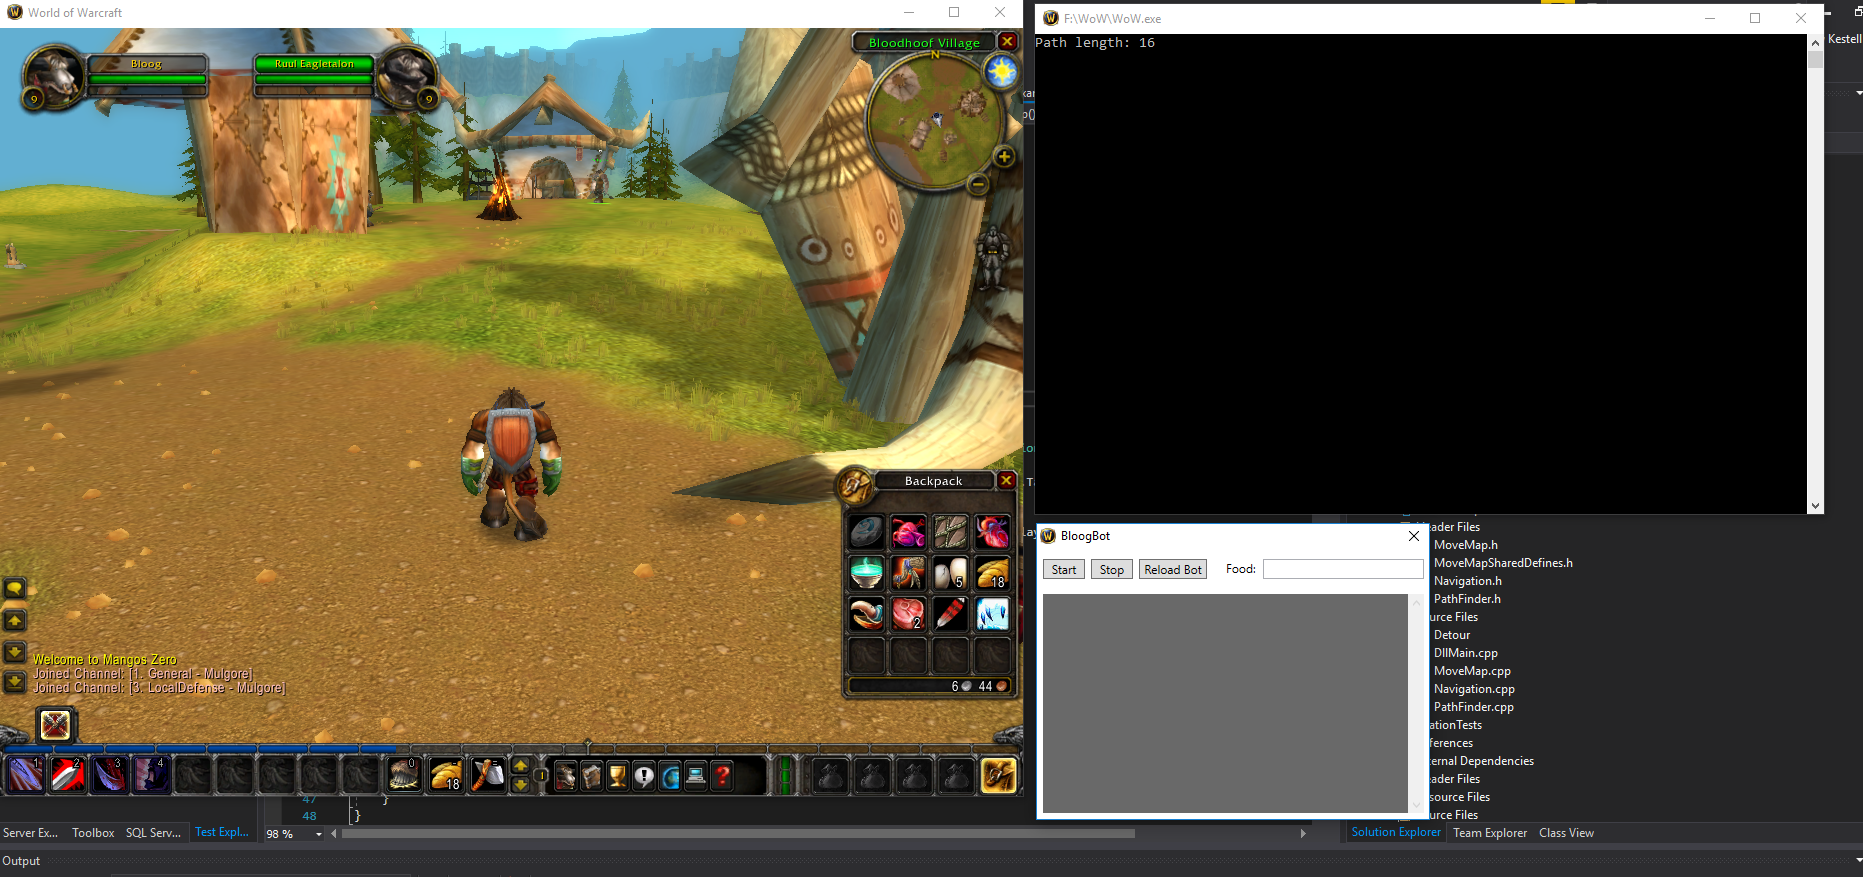
We're using the player's current position as the start, and the player's target as the end, then calling CalculatePath and printing the length of the path to the console. Again, we expect to see a path with more than 2 points. Fire up the bot and give it a test (note - the bot will take 5-10 seconds to load now, because we're initializing all the mmaps at startup):
Now, before we put our Navigation library to use, let's demonstrate the initial problem we set out to solve. Consider the following screenshot:
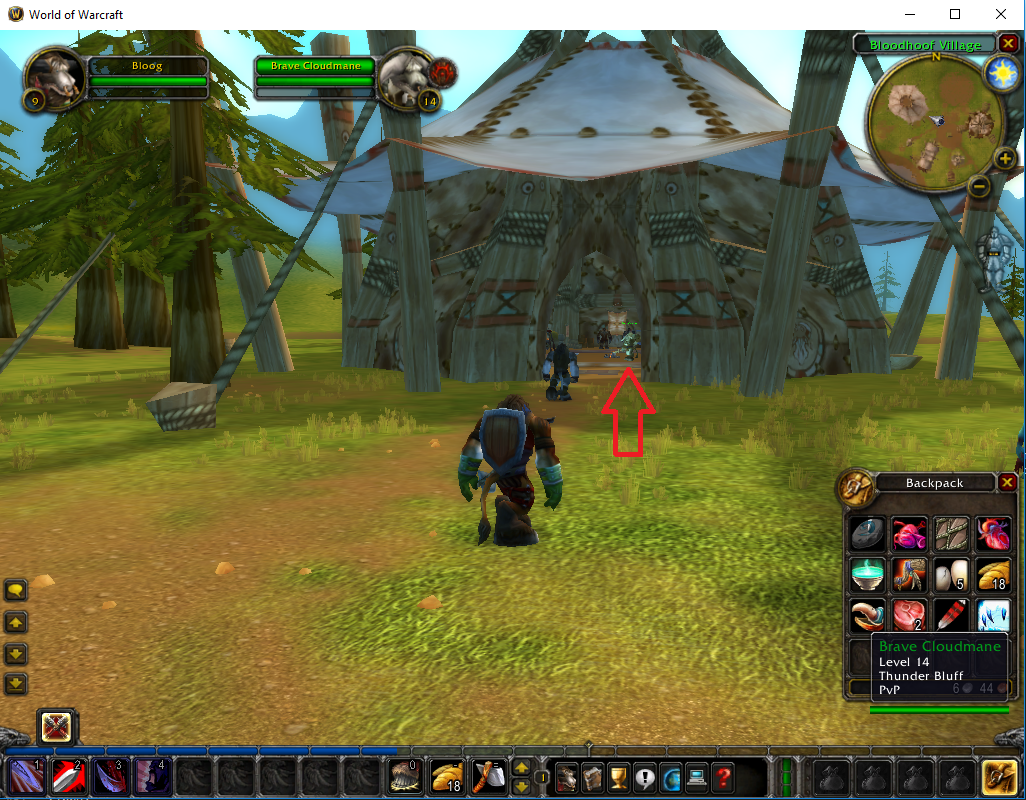
This is one of the main buildings in Bloodhoof Village. There are a bunch of NPCs in there. Let's say our bot wants to move to one of those NPCs to sell items or repair his gear, but if he's off to the side of the building, and he tries to navigate to the NPC in a straight line, he's going to run into the wall. From our bot, the code would look like this (we're using the Start method for testing again):
public void Start(string food)
{
    var target = ObjectManager.Units.FirstOrDefault(u => u.Guid == ObjectManager.Player.TargetGuid);
    if (target != null)
    {
        ObjectManager.Player.ClickToMove(target.Position);
    }
    //Running = true;
    //botStates.Push(new GrindState(botStates, food));
    //StartInternal();
}
That's obviously not going to cut it. So let's put our Navigation library to use. First, create a new NavigationTestState, and modify the Start method to push a new NavigationTestState onto the stack:
public void Start(string food)
{
    running = true;
    botStates.Push(new NavigationTestState(botStates));
    StartInternal();
}
And here's what the NavigationTestState looks like:
class NavigationTestState : IBotState
{
    readonly Stack<IBotState> botStates;
    readonly LocalPlayer player;
    readonly WoWUnit target;
    readonly Position[] path;

    int pathIndex = 1;

    public NavigationTestState(Stack<IBotState> botStates)
    {
        this.botStates = botStates;
        player = ObjectManager.Player;

        var target = ObjectManager.Units.FirstOrDefault(u => u.Guid == player.TargetGuid);
        if (target != null)
        {
            this.target = target;
            path = Navigation.CalculatePath(player.MapId, player.Position, target.Position, false);
        }
    }

    public void Update()
    {
        if (player.Position.DistanceTo(target.Position) < 3)
        {
            Console.WriteLine("Destination reached.");
            player.ClickToMoveStop();
            botStates.Pop();
        }

        if (player.Position.DistanceTo(path[pathIndex]) < 1)
        {
            Console.WriteLine($"Waypoint {pathIndex} of {path.Length} reached.");
            pathIndex++;
        }

        player.ClickToMove(path[pathIndex]);
    }
}
In the constructor, we call into our new Navigation library's CalculatePath function and save a reference to the Position[]. We want to "walk the path", moving from one point to the next, so we need to keep track of which point we're currently at - that's what pathIndex is for (we initialize it to 1, because 0 will represent the player's starting position, so point 1 is the first destination). In the Update method:
- If we're within 3 yards of the final destination, our trip is done, so we can stop movement and pop the state. 3 yards is close enough to interact with stuff in WoW so this is close enough.
- If we're within 1 yard of the current waypoint, we can increment
pathIndex. We can't check if the player's current position is EXACTLY at the point returned byCalculatePathbecause of inherent float point math imprecision, so we just check if the distance between the player and the point is less than 1 yard. - Each
Updatecall, we callClickToMoveto move toward the next waypoint in the path (note, there's no problem if we callClickToMoveif our character is already moving, so that won't be an issue).
Fire up the bot and give it a test:
Works great! Although the stutter-stepping is annoying. That's due to the fact that we're only calling Update once every 500ms. Let's increase that rate. Modify the StartInternal method in Bot.cs to update every 25ms instead:
async void StartInternal()
{
    while (running)
    {
        try
        {
            ThreadSynchronizer.RunOnMainThread(() =>
            {
                botStates.Peek()?.Update();
            });

            await Task.Delay(25);
        }
        catch (Exception e)
        {
            Console.WriteLine($"An error occured during the bot's main loop: {e}");
        }
    }
}
Here's another test with the faster update calls. It's a lot smoother now.
Now, there's one more complication we need to address. This testing is with a static target - but enemies that we're targeting in the wild are actually constantly moving around. So let's scrap this NavigationTestState and modify the actual MoveToTarget state to use our new Navigation library. Because the target is moving, we can't just calculate the path once in the state's constructor. Instead, we need to call CalculatePath to get a new navigation path every time Update is called. That way we can be sure we're moving to the right destination, and we can be sure that our path to that destination is free from obstructions. Additionally - because we're calling CalculatePath every update, we don't really care about the entire navigation path - we only care about the next waypoint. So let's add another method to Navigation.cs that simply returns the next waypoint.
public static Position GetNextWaypoint(uint mapId, Position start, Position end, bool straightPath)
{
    var path = CalculatePath(mapId, start, end, straightPath);

    if (path.Length <= 1)
        return path[0];

    return path[1];
}
And here's what MoveToTargetState looks like now:
class MoveToTargetState : IBotState
{
    const string Charge = "Charge";

    readonly Stack<IBotState> botStates;
    readonly LocalPlayer player;
    readonly WoWUnit target;
    readonly string food;

    internal MoveToTargetState(
        Stack<IBotState> botStates,
        WoWUnit target,
        string food)
    {
        this.botStates = botStates;
        player = ObjectManager.Player;
        this.target = target;
        this.food = food;
    }

    public void Update()
    {
        var distanceToTarget = player.Position.DistanceTo(target.Position);

        if (distanceToTarget < 25 && distanceToTarget > 8 && !player.IsCasting && player.IsSpellReady(Charge))
        {
            player.LuaCall($"CastSpellByName({Charge})");
            botStates.Pop();
            botStates.Push(new CombatState(botStates, target, food));
            return;
        }

        if (distanceToTarget < 5)
        {
            player.ClickToMoveStop();
            botStates.Pop();
            botStates.Push(new CombatState(botStates, target, food));
            return;
        }

        var nextWaypoint = Navigation.GetNextWaypoint(player.MapId, player.Position, target.Position, false);
        player.ClickToMove(nextWaypoint);
    }
}
Let's see it in action:
This Navigation library is probably the single most useful tool for our bot. It's going to allow us to do all sorts of cool stuff, like:
- Moving between different grinding areas
- Traveling back to town to sell loot, buy supplies, repair gear
- Traveling to the trainer to train new skills
- Moving back to your body after death
- And much more